创建 SpringBoot 项目
在某些时候https://start.spring.io这个网站访问不了, 同样 idea 也因为开 VPN 会莫名抽风, 而导致创建不了 SpringBoot 项目, 这就会显得非常蛋疼
以下是针对于开了 VPN 抽风的情况, 当然也可以通过更换仓库地址, 把 start.spring.io 换成 start.aliyun.io
ping 也 ping 不通
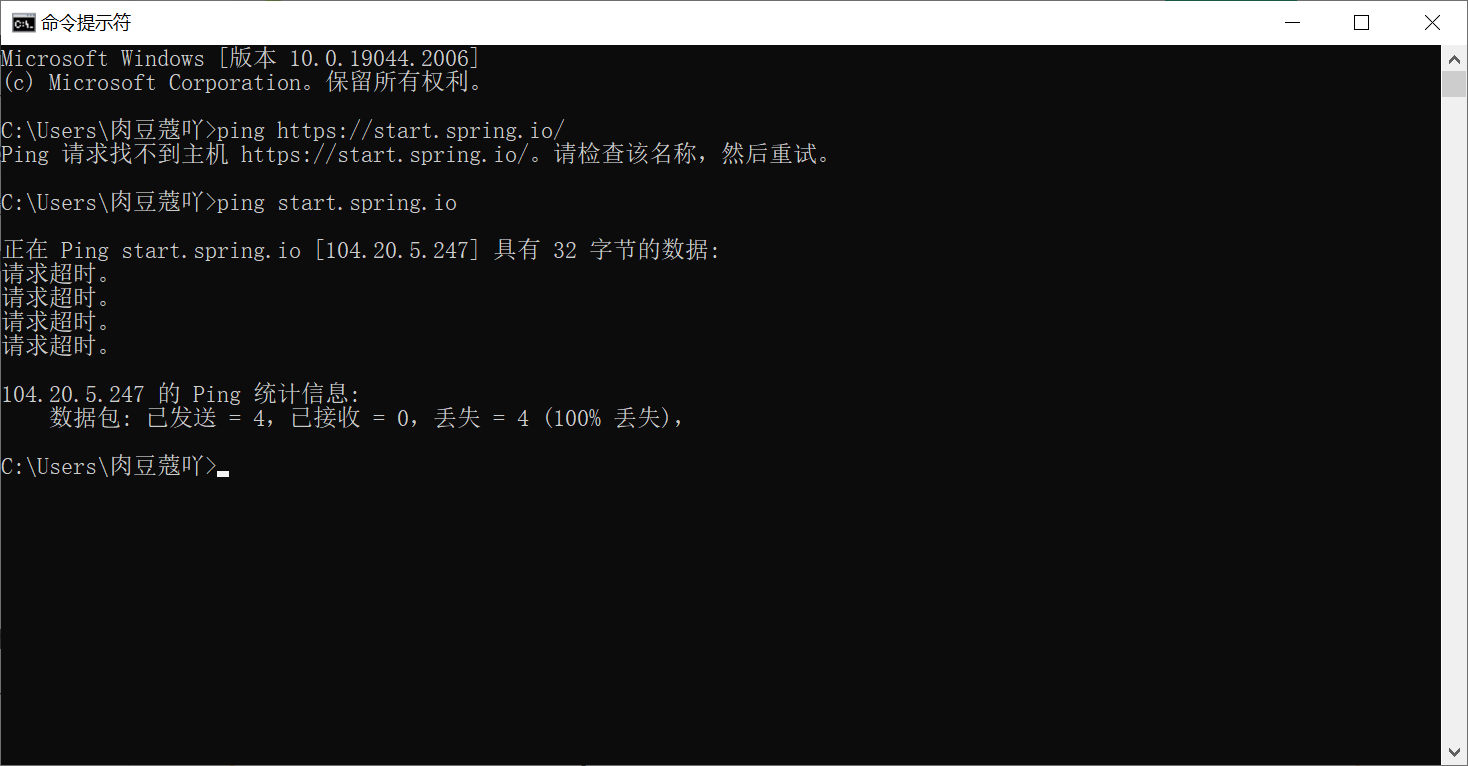
先查看代理的地址和端口
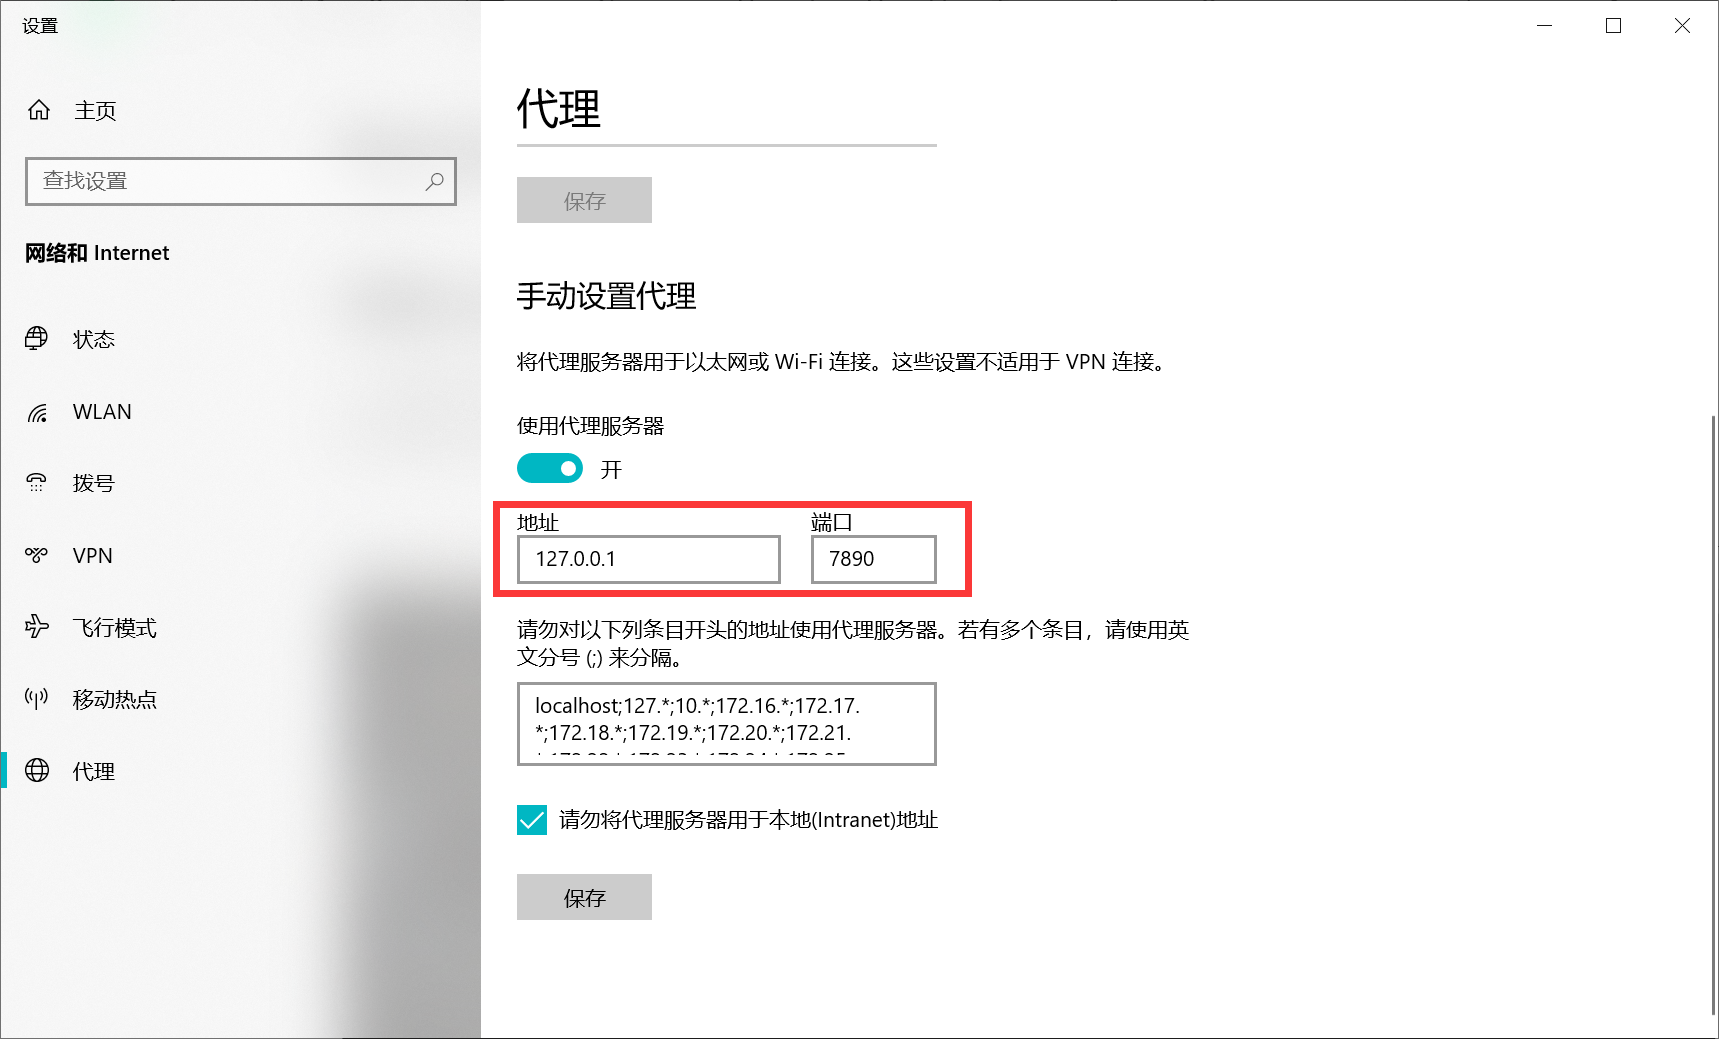
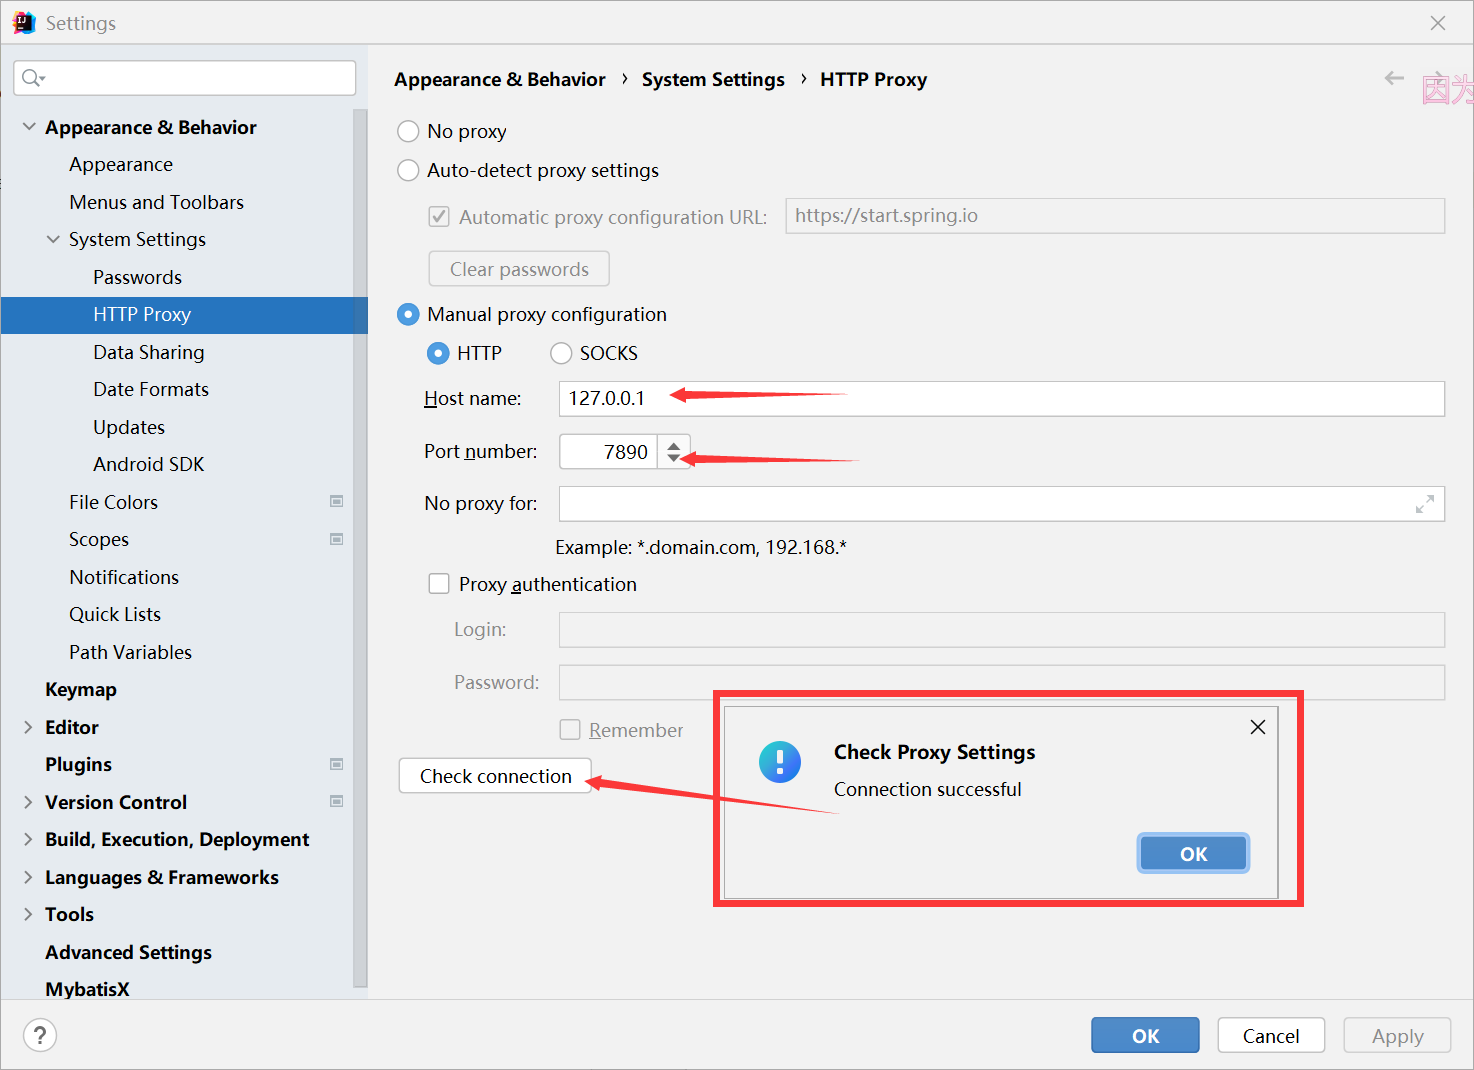
然后打开 idea 的 setting-Appearance&Behavior - System Settings - HTTP Proxy - Manual proxy configuration, 配置好当前代理的地址和端口号, 然后点击 Check connection 测试https://start.spring.io是否能连通, 多按测试两次按理应该会成功的
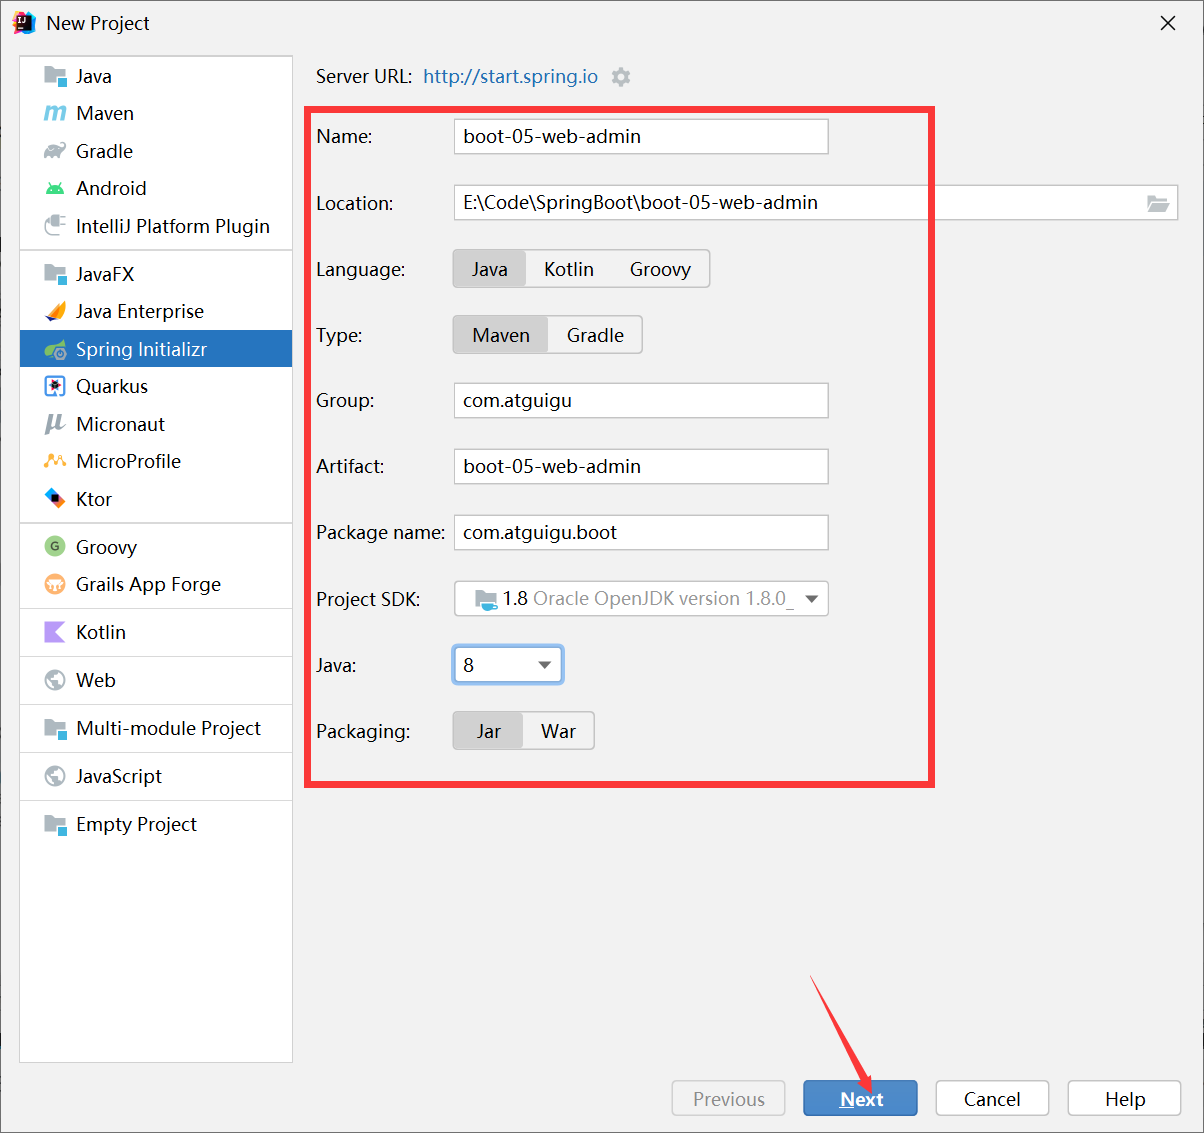
创建 SpringBoot, 选择 Spring Initializr, 填好对应的 Group 和 Artifact, 注意 Java 和电脑中安装的 JDK 的版本保持一致
然后这里可以选择一些常见的依赖例如 thymeleaf, devtools, lombok, configuration processor,
spring web, mysql 等等, 然后点击 Finish
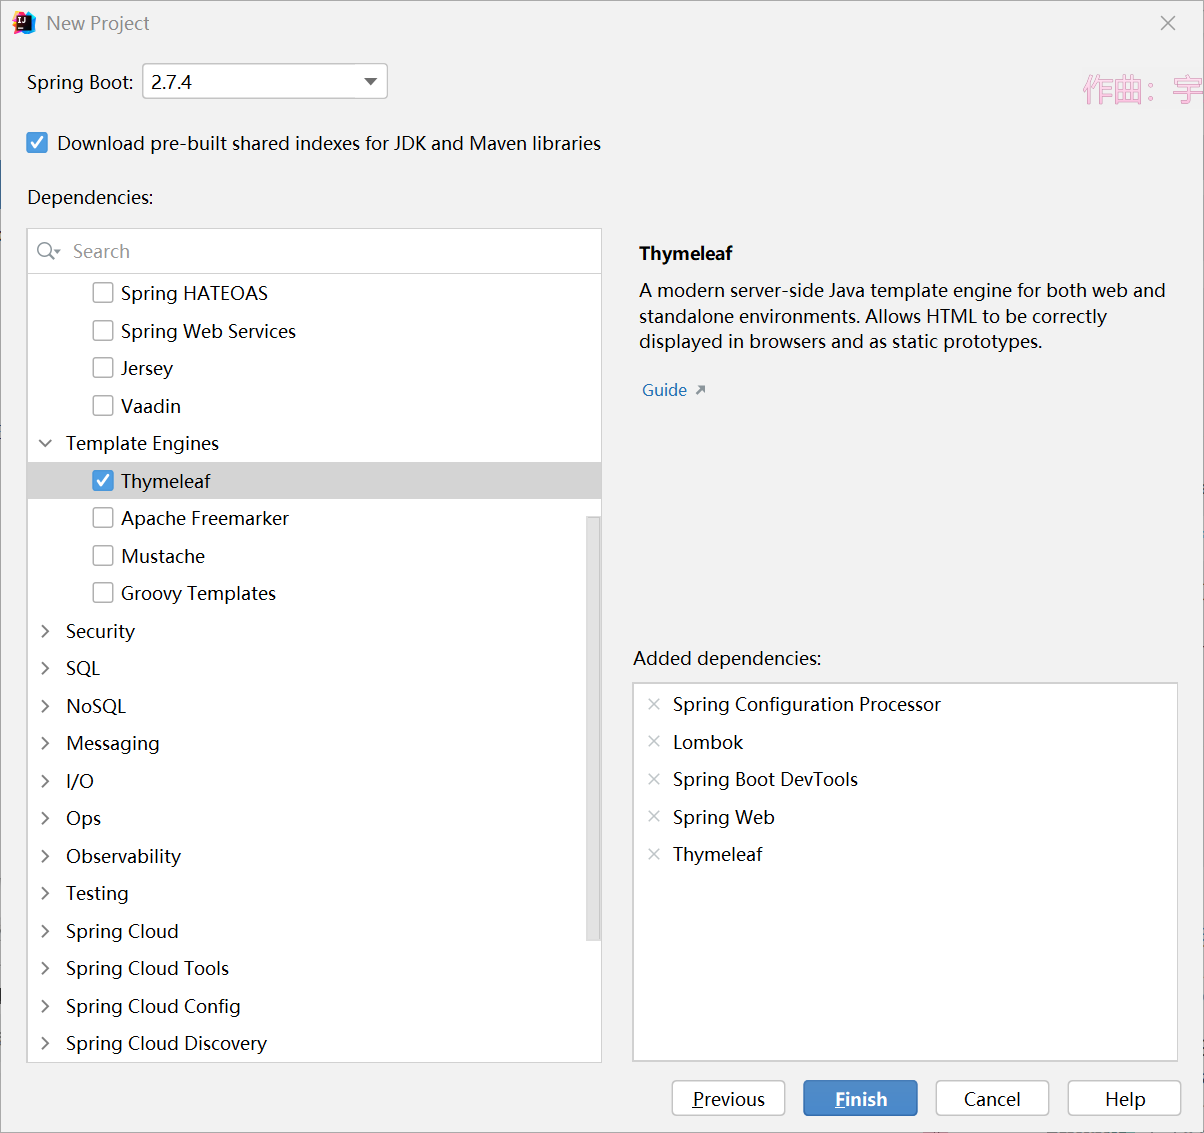
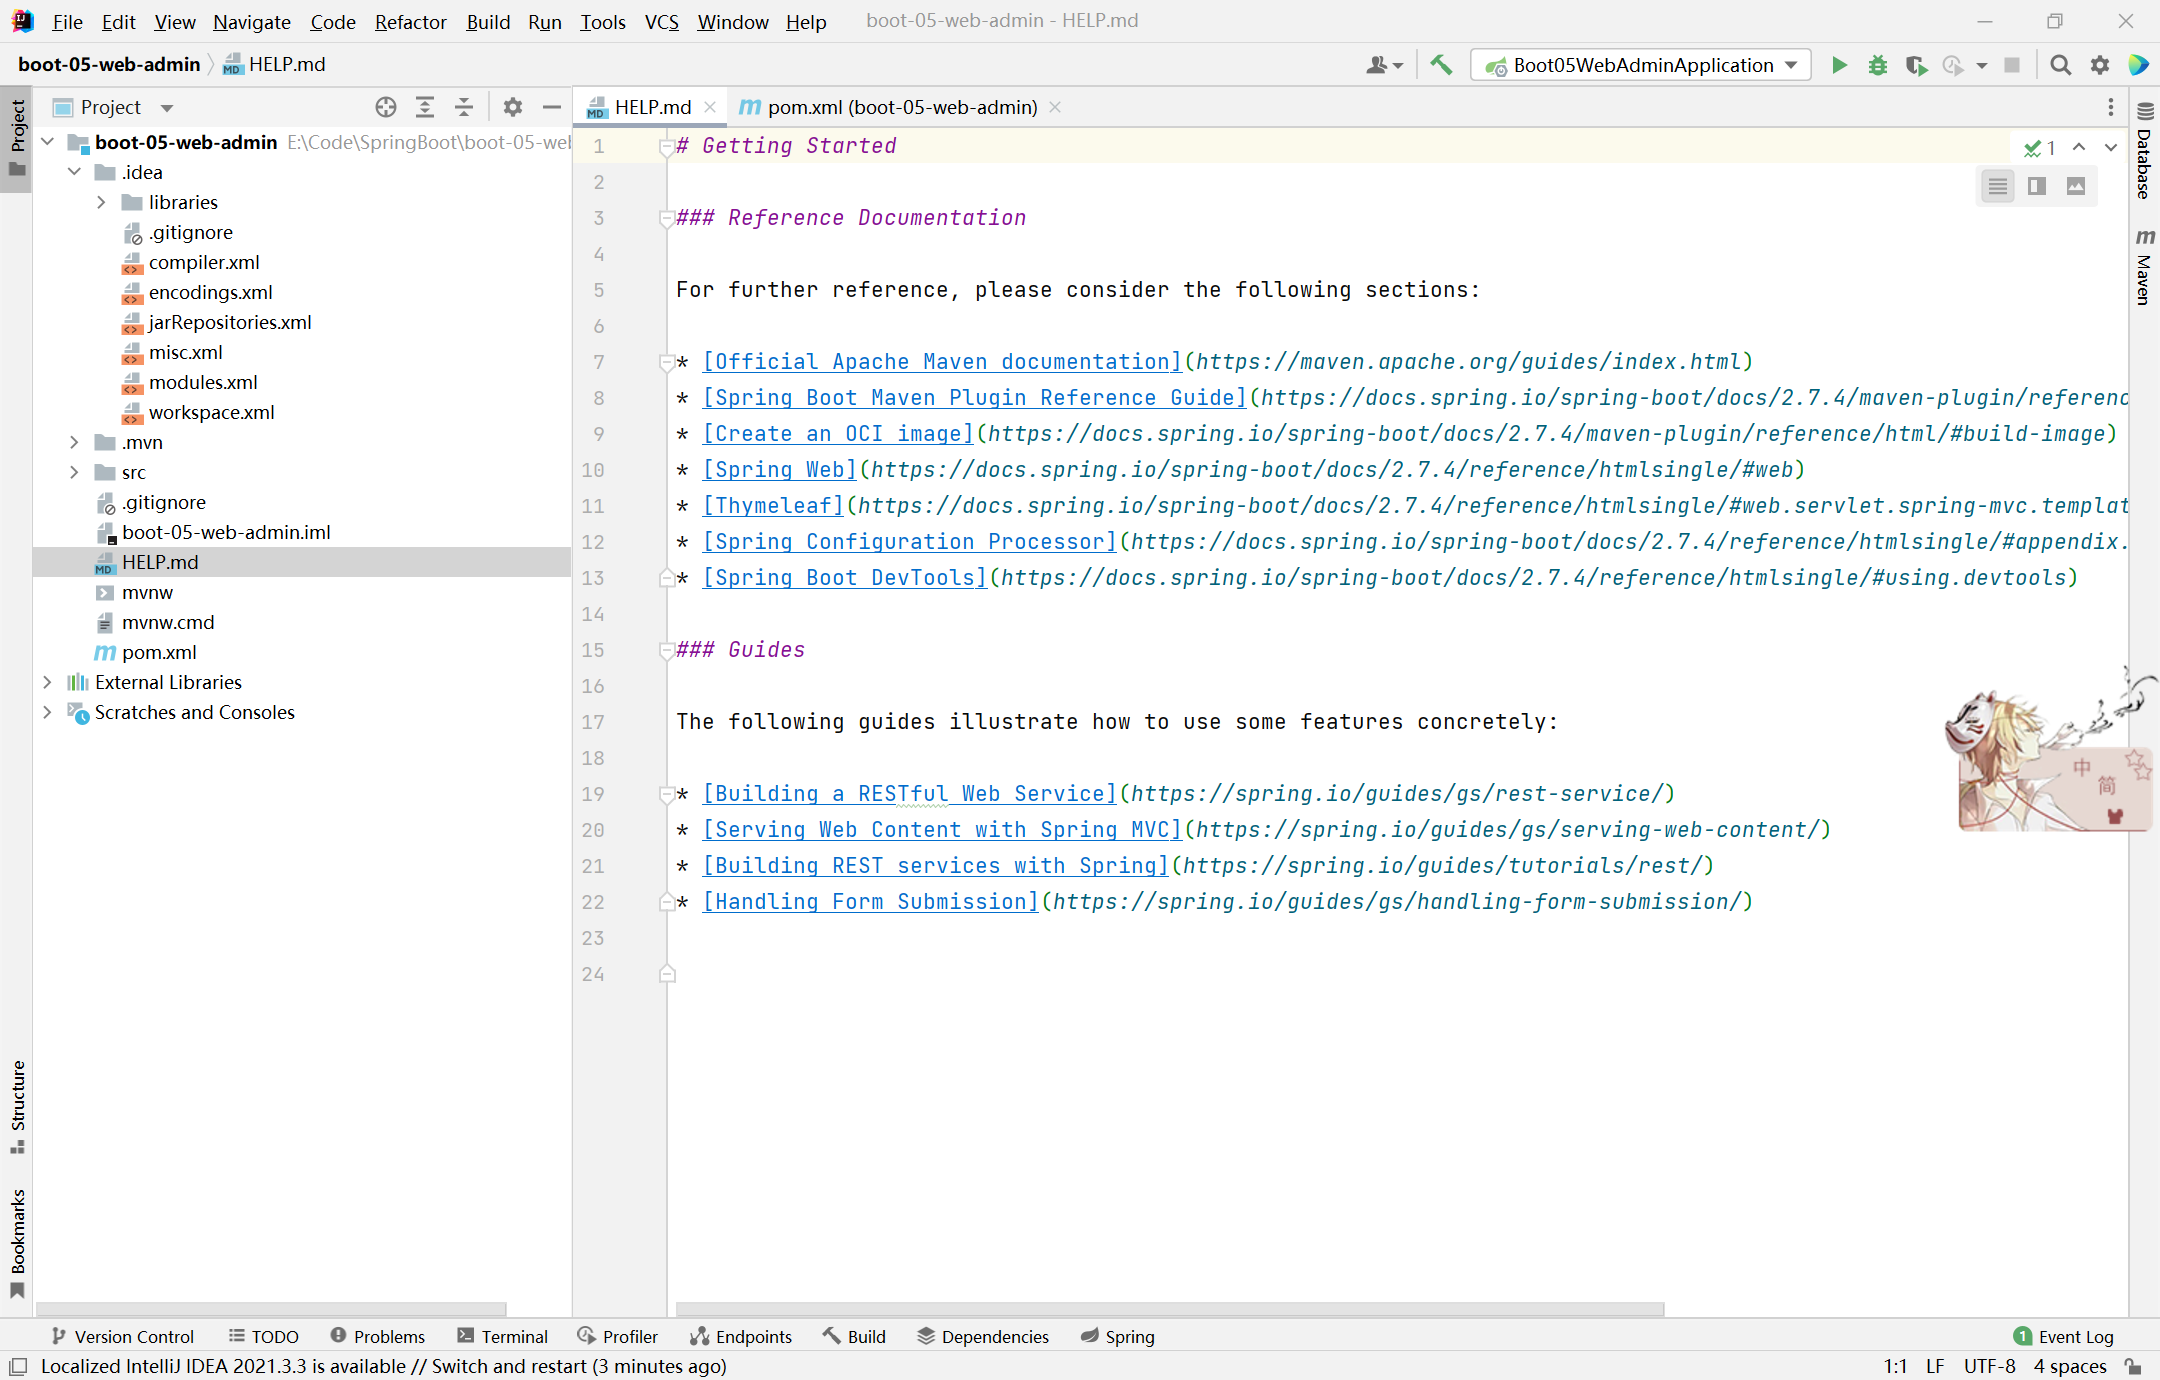
这样就完整的创建好的 SpringBoot 项目
Thymeleaf
1
2
3
4
5
6
7
8
9
10
| 加上在maven的配置文件pom.xml中加入一下依赖引入Thymeleaf
<dependency>
<groupId>org.springframework.boot</groupId>
<artifactId>spring-boot-starter-thymeleaf</artifactId>
</dependency>
需要在html的文件中引入xmlns:th="http://www.thymeleaf.org"
<html lang="en" xmlns:th="http://www.thymeleaf.org">
|
1
2
3
4
5
6
7
8
9
10
11
12
| <h1 th:text="${msg}">哈哈</h1>
获取请求域中共享数据使用$符号
<a th:href="${link}" href="www.haha.com">去百度</a> <br />
<a th:href="@{/link}" href="www.haha.com">去百度</a>
请求域中的连接地址, 也是使用$符号, @符号时给用来拼接地址用的 th:each="num :
${#numbers.sequence(from, to)}" th:each="num : ${#numbers.sequence(1,
users.pages)}" 用来创建一个数组遍历用的 @{/dynamic_table(pn=${num})}
使用小括号用来拼接参数 th:href="@{'/employee/page/' + ${page.prePage}}
或者使用字符串的拼接方式来写 行内写法 [[${session.loginUser.userName}]]
在application.yaml访问路径设置路径前缀, 这样设置之后, 访问都需要带上/world 例如,
原先是 http://localhost:8080/ 现在是 http://localhost:8080/world server:
servlet: context-path: /world
|
拦截器
HandlerInterceptor 接口
1
2
3
4
5
6
7
8
9
10
11
12
13
14
15
16
17
18
19
20
21
22
23
24
25
26
27
28
29
30
31
32
33
34
35
36
37
38
39
40
41
42
43
44
45
46
47
48
49
50
51
52
53
54
55
56
57
58
59
60
61
62
63
64
65
66
67
68
69
70
71
72
73
74
75
76
77
78
79
80
81
| package com.atguigu.boot.interceptor;
import lombok.extern.slf4j.Slf4j;
import org.springframework.web.servlet.HandlerInterceptor;
import org.springframework.web.servlet.ModelAndView;
import javax.servlet.http.HttpServletRequest;
import javax.servlet.http.HttpServletResponse;
import javax.servlet.http.HttpSession;
@Slf4j
public class LoginInterceptor implements HandlerInterceptor {
@Override
public boolean preHandle(HttpServletRequest request, HttpServletResponse response, Object handler) throws Exception {
String requestURI = request.getRequestURI();
log.info("拦截的请求路径是{}", requestURI);
log.info("preHandle{}", requestURI);
HttpSession session = request.getSession();
Object loginUser = session.getAttribute("loginUser");
if (loginUser != null) {
return true;
}
request.setAttribute("msg", "请先登录");
request.getRequestDispatcher("/").forward(request, response);
return false;
}
@Override
public void postHandle(HttpServletRequest request, HttpServletResponse response, Object handler, ModelAndView modelAndView) throws Exception {
log.info("postHandle{}", modelAndView);
}
@Override
public void afterCompletion(HttpServletRequest request, HttpServletResponse response, Object handler, Exception ex) throws Exception {
log.info("afterCompletion{}", ex);
}
}
|
配置拦截器
1
2
3
4
5
6
7
8
9
10
11
12
13
14
15
16
17
18
19
20
21
22
23
| package com.atguigu.boot.config;
import com.atguigu.boot.interceptor.LoginInterceptor;
import org.springframework.context.annotation.Configuration;
import org.springframework.web.servlet.config.annotation.InterceptorRegistry;
import org.springframework.web.servlet.config.annotation.WebMvcConfigurer;
@Configuration
public class AdminWebConfig implements WebMvcConfigurer {
@Override
public void addInterceptors(InterceptorRegistry registry) {
registry.addInterceptor(new LoginInterceptor())
.addPathPatterns("/**")
.excludePathPatterns("/login", "/", "/css/**", "/js/**", "/images/**", "/fonts/**");
}
}
|
3、拦截器原理
1、根据当前请求,找到HandlerExecutionChain【可以处理请求的 handler 以及 handler 的所有 拦截器】
2、先来**顺序执行 **所有拦截器的 preHandle 方法
- 1、如果当前拦截器 prehandler 返回为 true。则执行下一个拦截器的 preHandle
- 2、如果当前拦截器返回为 false。直接 倒序执行所有已经执行了的拦截器的 afterCompletion;
3、如果任何一个拦截器返回 false。直接跳出不执行目标方法
4、所有拦截器都返回 True。执行目标方法
5、倒序执行所有拦截器的 postHandle 方法。
**6、前面的步骤有任何异常都会直接倒序触发 **afterCompletion
7、页面成功渲染完成以后,也会倒序触发 afterCompletion
文件上传
1
2
3
4
5
6
7
8
9
10
11
12
13
14
15
16
17
18
19
| method要是post请求才能上传文件 enctype="multipart/form-data"
实现文件上传的时候form表单需要指定enctype这个属性
多文件上传需要在input标签中加上multiple属性, 表示多个文件上传
单文件上传不需要指定multiple
<form
role="form"
th:action="@{/upload}"
method="post"
enctype="multipart/form-data"
>
<div class="form-group">
<label for="exampleInputFile">头像</label>
<input type="file" name="headerImg" id="exampleInputFile" />
</div>
<div class="form-group">
<label for="exampleInputFile">生活照</label>
<input type="file" name="photos" multiple />
</div>
</form>
|
1
2
3
4
5
6
7
8
9
10
11
12
13
14
15
16
17
18
19
20
21
22
23
24
25
26
27
28
29
30
| @PostMapping("/upload")
public String upload(@RequestParam("email") String email,
@RequestParam("username") String username,
@RequestPart MultipartFile headerImg,
@RequestPart MultipartFile[] photos) throws IOException {
log.info("email={}, username={}, headerImg={}, photos={}",
email, username, headerImg.getSize(), photos.length);
if (!headerImg.isEmpty()) {
String originalFilename = headerImg.getOriginalFilename();
String name = headerImg.getName();
log.info("originalFilename = {}, name = {}", originalFilename, name);
headerImg.transferTo(new File("E:\\upload\\" + originalFilename));
}
for (MultipartFile photo : photos) {
if (!photo.isEmpty()) {
String originalFilename = photo.getOriginalFilename();
String name = photo.getName();
log.info("originalFilename = {}, name = {}", originalFilename, name);
photo.transferTo(new File("E:\\upload\\" + originalFilename));
}
}
return "main";
}
|
1
2
3
4
| 配置文件上传大小的, 单个文件最大上限设置10MB
单次请求最大100MB
spring.servlet.multipart.max-file-size=10MB
spring.servlet.multipart.max-request-size=100MB
|
错误处理
Web 原生组件注入
1.使用 Servlet API
@ServletComponentScan(basePackages = “com.atguigu.boot”)
指定原生 Servlet 组件都放在哪里
@WebServlet(urlPatterns = “/my”)
效果: 直接响应, 没有 Spring 拦截器
@WebFilter(urlPatterns = {“/css/“, “/images/“})
@WebListener
推荐可以使用这种方式:
/*是 Servlet 的写法
/**是 Spring 家族的写法
2.使用 RegistrationBean
ServletRegistrationBean, FilterRegistrationBean, and ServletListenerRegistrationBean
1
2
3
4
5
6
7
8
9
10
11
12
13
14
15
16
17
18
19
20
21
22
23
24
25
| @Configuration
public class MyRegisterConfig {
@Bean
public ServletRegistrationBean myServlet() {
MyServlet myServlet = new MyServlet();
return new ServletRegistrationBean(myServlet, "/my", "/my02");
}
@Bean
public FilterRegistrationBean myFilter() {
MyFilter myFilter = new MyFilter();
FilterRegistrationBean filterRegistrationBean = new FilterRegistrationBean(myFilter);
filterRegistrationBean.setUrlPatterns(Arrays.asList("/my", "/css/*"));
return filterRegistrationBean;
}
@Bean
public ServletListenerRegistrationBean myListener() {
MyServletContextListener myServletContextListener = new MyServletContextListener();
return new ServletListenerRegistrationBean(myServletContextListener);
}
}
|
数据访问
1.导入 jdbc 场景
1
2
3
4
| <dependency>
<groupId>org.springframework.boot</groupId>
<artifactId>spring-boot-starter-data-jdbc</artifactId>
</dependency>
|
1
2
3
4
5
6
7
8
| spring:
datasource:
url: jdbc:mysql://localhost:3306/ssm&useUnicode=true&characterEncoding=utf-8&useSSL=false&serverTimezone=UTC%2B8
username: root
password: 123456
driver-class-name: com.mysql.cj.jdbc.Driver
|
使用 Druid 数据源
1
2
3
4
5
| <dependency>
<groupId>com.alibaba</groupId>
<artifactId>druid-spring-boot-starter</artifactId>
<version>1.1.17</version>
</dependency>
|
配置示例
1
2
3
4
5
6
7
8
9
10
11
12
13
14
15
16
17
18
19
20
21
22
23
24
25
26
27
28
29
30
31
| spring:
datasource:
url: jdbc:mysql://localhost:3306/db_account
username: root
password: 123456
driver-class-name: com.mysql.jdbc.Driver
druid:
aop-patterns: com.atguigu.admin.*
filters: stat,wall
stat-view-servlet:
enabled: true
login-username: admin
login-password: admin
resetEnable: false
web-stat-filter:
enabled: true
urlPattern: /*
exclusions: "*.js,*.gif,*.jpg,*.png,*.css,*.ico,/druid/*"
filter:
stat:
slow-sql-millis: 1000
logSlowSql: true
enabled: true
wall:
enabled: true
config:
drop-table-allow: false
|
整合 MyBatis 操作
https://github.com/mybatis
1
2
3
4
5
| <dependency>
<groupId>org.mybatis.spring.boot</groupId>
<artifactId>mybatis-spring-boot-starter</artifactId>
<version>2.2.2</version>
</dependency>
|
1
2
3
4
5
6
7
8
9
10
11
12
13
|
mybatis:
config-location: classpath:mybatis/mybatis-config.xml
mapper-locations: classpath:mybatis/mapper/*.xml
Mapper接口 --> 绑定xml
<mapper namespace="com.atguigu.boot.mapper.AccountMapper">
<!--public Account getAccount(Long id);-->
<select id="getAccount" resultType="com.atguigu.boot.bean.Account">
select * from account_tbl where id =
</select>
</mapper>
|
1
2
3
4
5
6
7
|
mybatis:
mapper-locations: classpath:mybatis/mapper/*.xml
configuration:
map-underscore-to-camel-case: true
|
- 导入 mybatis 官方 starter
- 编写 mapper 接口, 标注@Mapper 注解
- 编写 sql 映射文件并绑定 mapper 接口
- 在 application.yaml 中制定 Mapper 配置文件的位置, 以及制定全局配置文件的信息(建议: 配置在 mybatis.configuration)
使用 MyBatisPlus 的依赖
1
2
3
4
5
| <dependency>
<groupId>com.baomidou</groupId>
<artifactId>mybatis-plus-boot-starter</artifactId>
<version>最新版本</version>
</dependency>
|
分页插件
1
2
3
4
5
| <dependency>
<groupId>com.github.pagehelper</groupId>
<artifactId>pagehelper</artifactId>
<version>最新版本</version>
</dependency>
|
redis 配置
1
2
3
4
| <dependency>
<groupId>org.springframework.boot</groupId>
<artifactId>spring-boot-starter-data-redis</artifactId>
</dependency>
|
在 yaml 中配置 redis 的连接 url
1
2
3
4
5
6
7
8
9
10
11
12
| spring:
redis:
url: redis://192.168.1.100:6379
redis:
host: 192.168.1.100
port: 6379
password: ''
|
RedisTemplate 与 Lettuce
1
2
3
4
5
6
7
8
9
10
| @Autowired
StringRedisTemplate redisTemplate;
@Test
public void testRedis() {
ValueOperations<String, String> operations = redisTemplate.opsForValue();
operations.set("hello", "world");
String hello = operations.get("hello");
System.out.println(hello);
}
|
切换 jedis
1
2
3
4
5
6
7
8
9
| <dependency>
<groupId>org.springframework.boot</groupId>
<artifactId>spring-boot-starter-data-redis</artifactId>
</dependency>
<dependency>
<groupId>redis.clients</groupId>
<artifactId>jedis</artifactId>
</dependency>
|
1
2
3
4
5
6
7
8
9
10
11
12
13
14
| spring:
redis:
host: 192.168.1.100
port: 6379
password: ''
client-type: jedis
|
1
2
3
4
5
6
7
8
9
10
11
12
13
14
15
| @Autowired
RedisConnectionFactory redisConnectionFactory;
@Test
public void testRedis() {
ValueOperations<String, String> operations = redisTemplate.opsForValue();
operations.set("hello", "world");
String hello = operations.get("hello");
System.out.println(hello);
System.out.println(redisConnectionFactory.getClass());
}
输出结果
world
class org.springframework.data.redis.connection.jedis.JedisConnectionFactory
|
一个小 demo, 用来记录用户访问了当前 uri 的次数
配置拦截器
1
2
3
4
5
6
7
8
9
10
11
12
13
14
15
| @Component
public class RedisUrlCountInterceptor implements HandlerInterceptor {
@Autowired
StringRedisTemplate redisTemplate;
@Override
public boolean preHandle(HttpServletRequest request, HttpServletResponse response, Object handler) throws Exception {
String uri = request.getRequestURI();
redisTemplate.opsForValue().increment(uri);
return true;
}
}
|
1
2
3
4
5
6
7
8
9
10
11
12
13
14
15
16
17
18
19
20
21
22
23
| @Configuration
public class AdminWebConfig implements WebMvcConfigurer {
@Autowired
RedisUrlCountInterceptor redisUrlCountInterceptor;
@Override
public void addInterceptors(InterceptorRegistry registry) {
registry.addInterceptor(new LoginInterceptor())
.addPathPatterns("/**")
.excludePathPatterns("/login", "/", "/css/**", "/js/**", "/images/**", "/fonts/**");
registry.addInterceptor(redisUrlCountInterceptor)
.addPathPatterns("/**")
.excludePathPatterns("/login", "/", "/css/**", "/js/**", "/images/**", "/fonts/**");
}
}
|
1
2
3
4
5
6
7
8
9
10
11
12
13
14
15
16
17
18
19
20
21
22
23
24
25
26
27
| @Autowired
StringRedisTemplate redisTemplate;
@GetMapping("/main.html")
public String mainPage(HttpSession session, Model model) {
log.info("当前方法{}", "mainPage");
String s = redisTemplate.opsForValue().get("/main.html");
String s1 = redisTemplate.opsForValue().get("/sql");
String s2 = redisTemplate.opsForValue().get("/dynamic_table");
String s3 = redisTemplate.opsForValue().get("/error");
model.addAttribute("mainCount", s);
model.addAttribute("sqlCount", s1);
model.addAttribute("dynamic_tableCount", s2);
model.addAttribute("errorCount", s3);
return "main";
}
|
单元测试
1
2
3
4
5
| <dependency>
<groupId>org.springframework.boot</groupId>
<artifactId>spring-boot-starter-test</artifactId>
<scope>test</scope>
</dependency>
|
1
2
3
4
5
6
7
8
9
10
11
12
13
14
15
16
17
18
19
20
21
22
23
24
25
26
27
28
29
30
31
32
33
34
35
36
37
38
39
40
41
42
43
44
45
46
47
48
49
50
51
52
53
54
55
56
57
58
| @DisplayName("junit5功能测试类")
@SpringBootTest
public class Junit5Test {
@Autowired
JdbcTemplate jdbcTemplate;
@DisplayName("测试displayname注解")
@Test
void testDisplayName() {
System.out.println(1);
System.out.println(jdbcTemplate);
}
@Disabled
@DisplayName("测试方法2")
@Test
void test2() {
System.out.println(1);
}
@RepeatedTest(5)
@Test
void test3() {
System.out.println(3);
}
@Test
@Timeout(value = 500, unit = TimeUnit.MILLISECONDS)
void testTimeout() throws InterruptedException {
Thread.sleep(600);
}
@BeforeEach
void testBeforeEach() {
System.out.println("测试就要开始了...");
}
@AfterEach
void testAfterEach() {
System.out.println("测试结束了...");
}
@BeforeAll
static void testBeforeAll() {
System.out.println("所有测试就要开始了...");
}
@AfterAll
static void testAfterAll() {
System.out.println("所有测试已经结束了...");
}
}
|
打开 Java 监控和管理控制台
1
2
| cmd
C:\Users\肉豆蔻吖>jconsole
|
application-profile 功能
1
2
3
4
5
| ○ 命令行激活:java -jar xxx.jar --spring.profiles.active=prod --person.name=haha
■ 修改配置文件的任意值,命令行优先
E:\Code\SpringBoot\boot-09-features-profiles\target>java -jar boot-09-features-profiles-0.0.1-SNAPSHOT.jar --spring.profiles.active=test
E:\Code\SpringBoot\boot-09-features-profiles\target>java -jar boot-09-features-profiles-0.0.1-SNAPSHOT.jar --spring.profiles.active=test --person.name=hello
|
跨域 CORS


前端访问的页面加
1
| <meta http-equiv="Access-Control-Allow-Origin" content="*">
|
后端采用注解
参考:


